Make sure you sign up on my mailing list (just below on the right) before you leave! Your address is SUPER safe with me.

Friday, June 27, 2014

Camerawith!

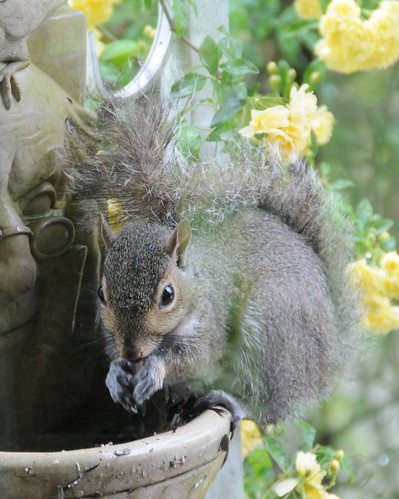
170mm, ISO 200, f/5.6, 1/25th of sec, ambient light only

I'm starting a challenge here, and it's called Camerawith! 

At its very core, it means to always have your camera nearby, whenever possible. In other words, carry your camera with you! What good is it if you leave it at home? You can have a $5,000 Nikon camera, and if you don't have it when an awesome picture is just waiting to be captured, what good is it? I'd rather have a $200 camera in my pocket in that case.

Everyone has a cell phone with a camera nowadays. Granted, there are some out there that are better than others...but for the most part, the quality of the pictures they produce cannot compare with those of a basic point and shoot camera with a zoom lens. So when I say, 'Take Your Camera With You', you can't cheat and say..."well, I've got my phone!". Save your smartphone for the selfies (click here if don't know what a selfie is) and birthday party snapshots. 

I use my smartphone camera all the time for snapshots, and it's great for just that...snapshots. It's wonderfully quick for taking a quick shot of our little boy, my wife, or one of the pussy cats and then posting it on Twitter or Facebook. I mean, it couldn't be easier right?

But Camerawith! is referring to something deeper. Everyone has an artistic side of themselves, and for you and I (I say you because you are reading a blog about photography) our outlet/release for our artistic ability is thru taking photographs. Photography is an art at its very core, and this challenge is designed to get you open your eyes and see the world around you. Then, when you happen across something outside of the ordinary, spend that extra few minutes to get out your camera and capture that moment. 

And this part is KEY...when you have your camera with you, you will begin to look for and seek out things you can capture that on an ordinary day you would walk right past. It's like when you got a Nerf gun as kid, what do you do?? You look for things to shoot at. Same thing. Simply by taking your camera with you, your eyes will open up. How neat.

Do you know what this challenge will do for you if you take it on? It will make you a happier person. It will UP your level of satisfaction...that feel-good-but-don't-know-why feeling. With all the craziness in the world and negative things in this life that tries to consume every bit of your time, we all need a little intentional positive reinforcement. Essentially, all I'm encouraging you to do is "stop and smell the roses"...but instead of smell them, photograph them. If you will take just 5 minutes out of your day (that's less than half of one percent by the way) and photograph something that stands out to you, it will force your level of contentment to rise...I promise you. Your life-appreciation will begin to increase. 

So, which is the best camera to 'take with you'? That's easy. The one you will use! If you are not comfortable with a DSLR (the type of camera with interchangeable lenses), the next best thing is a point-and-shoot camera that you can put in manual mode (click here for my post on shooting in manual mode...It'll open the door to a whole new world). But seriously...the best camera is the one you will actually use. (I will touch on a few examples of some of the more inexpensive cameras I recommend in a later post if you are interested.)

Note the little squirrel up top. He is just helping himself to some bird seed, shamelessly. It tears my father up when he looks outside and finds the squirrels stealing the birds' food that he takes time to put out every day. It makes me laugh to look at this photograph. It brings me to a happy place in my mind and makes me focus on my parent's home more than the actual squirrel. If I had of forgotten my camera that day when we went to go see them, I wouldn't have captured this image and this brief little nugget of happiness would have escaped. 

Camerawith! ...Take Your Camera With You. Accept the challenge and go out and shoot something meaningful to you today.

Thanks for reading!

Brant
 

Friday, June 20, 2014

Make Ambient Light Work For You

cat, pet
50mm, ISO 400, f/2.8, 1/60th sec, ambient & artificial lighting
Summarizing today's post: Off-camera lighting, balancing ambient (available) light with flash, & pet photography.

Now that I've touched a bit on what it is I am doing here -- my purpose so-to-speak -- let's get back to lighting.

Using two off-camera strobes is my personal lighting of choice, as in my self-portrait (shown here). One to camera left, the other to camera right. The key light is the muscle -- illuminating the scene with the majority of the usable light -- and the fill light is there softening the shadows cast by my key light.

I've tried in the past to give a little encouragement to those who do not have but one off-camera flash at this point in their collection. Gear is expensive (I realize) and I want you to learn everything you can about one piece of equipment before you go spend more on something else. As I have said before...I could keep myself busy for a long, long time with just a single strobe.

Now, as promised, I will demonstrate how you can make that one little strobe go further. It's all about using what is already there...good quality ambient light. And striking a balance. It's all about balancing light...or leveraging light. (We'll talk a bit more on leveraging light next time.)

What you have seen me do the most in past posts -- when it comes to adding my own light with strobes -- is to "cut out" or "turn off" all ambient light before doing anything else. I do this by working indoors and setting my camera to a fast shutter speed (most often to 1/250th of a second). 

Why do this? Two reasons. To make a point with the lighting set up I am demonstrating at the time (the main reason), and two, most indoor lighting stinks when it comes to using it in your photograph. The light is either too yellow (projected by incandescent lamps) or too green (thrown off my fluorescent lights). So off with you! (I think its so neat that you can "turn off" the light you don't need without going over to the light switch...but that's just me.)

Now we are going to switch gears and move outdoors. True, you can take some good shots indoors using only one strobe, but in my opinion you get the best results by mixing controlled artificial light with available light. And the best available (ambient) light is found outside...in the shade. 

So let's go, grab your camera and your one strobe and find yourself a nice shady spot outside. The best time of day to shoot in our case is going to be right after sunset, but as long as you can find an abundance of shade (say under the covering of some thick trees) you can do this even during the middle of the day. We are looking for that pure "white light" to use as our ambient, natural light.

I am using Spooky as my subject today. Such a sweet pussy cat...she's all into what ever I am doing outside at the time. You saw the finished product up above, but let's see where I started first.


shot at 50mm, ISO 400, f/2.8, 1/80th of a sec, natural outdoor lighting just after sunset
After adjusting my camera settings for the correct exposure using only ambient light (which always takes a few practice shots before I even focus on the subject) I was ready to go. Spooky was actually ready before I was, she had plopped down in a perfect pose. This first shot of her stretched out on the table was using only natural available light. OKAY, but her face is underexposed...a little too dark. 

Let's bring out my little SB-800 strobe and lighten her a little.

shot at 50mm, ISO 400, f/2.8, 1/60th of a sec, strobe to camera left added, set at 1/128th power
Now, she is really getting into it! Flipped all upside down posing like a pro. My goodness. I set up my strobe to camera left and powered it down to the lowest possible setting, 1/128th. It doesn't take much to throw a little highlight onto her in this relatively low light condition (and with the strobe set up only 4 feet away). I increased the background (ambient light) just a tad by setting my shutter speed slightly slower in this photo.

Now I'm satisfied. All the colors of her coat are shining bright. Beautiful.

This is balancing light. This is how to make ambient/natural light work for you. Go try it for yourself and have some fun.

Thanks for reading!

Brant


Wow, look at you...you made it all the way thru my post! I really appreciate you as a reader. Don't forget to register your email for automatic updates up at the top. Please pass this blog post on to your friends using the Tweet, Facebook, and Google+ buttons. That would be awesome.


Saturday, June 7, 2014

I Am a Photographer

Summarizing today's post: Differentiating between different types of photographers, the purpose of this blog, & encouraging you to blow the dust off your camera!


shot at 82mm, ISO 200, 1/1250 sec, f/5, shallow depth of field demonstrated

I call myself a photographer, but what does that mean exactly?

For you, it may mean you are a 9-5 professional portrait photographer who works inside of a studio all day with your name, "Joe's Photography", on the front glass window. You are a true professional. Most often in this case, this business has been established for years, maybe spanning a couple generations.

For another person, being a photographer may mean they are a banker during daytime working hours, then he or she has a little side job doing freelance photojournalist gigs in the evenings. Still a professional, just at it part-time. 

And then there's the guy who just loves to take photos with the camera on his smartphone or pocket camera. A professional? No. A photographer? You bet!

They are all photographers, really. But the degree of "professional" would relate back to a couple of things. Namely...is this what they do for a living? Are they so good at what they do that they get paid for it? 

But other than getting paid for their services (or not), what sets these 3 fellows apart from one another? So many things. And are there other types/categories of photographers? You bet there are. So many in fact, it's difficult to name them all (if not impossible).

I have been struggling for awhile now, trying to decide on what "kind" of photographer I really am. More specifically...I am trying to hone a clear path for this blog. What is it I actually do and what is my purpose? In what place do I fall within the 3 examples of photographers above? The answer to that is, that I don't. I don't fall nicely into any one of those categories. I (like many others) fall into a category all my own.

I am a self-taught, no-official-training, amateur photographer. When I got my first Pentax 35mm camera at age 12, something happened...a spark started to grow. Now, 25 years later (and much more equipment later) I am still trying to define exactly what I want to do with this skill of mine. It's a work in progress to say the least. 

I am passionate about capturing images around me in this world. I am passionate about creative lighting. And I am passionate about stopping time for at least a moment, and savoring it. (The only way to stop time in its tracks is with a photograph...ever thought about that?)

Lastly, I want to help others (thru coaching) develop their love for photography and let their creativity blossom. That's it, that's my purpose. That's why I have created this blog. [you can also see my Welcome page here.

My target audience would be the person who has this awesome camera sitting in his/her closet, but doesn't know how to use it to its full potential. They may take it out for the kids' birthday parties and vacation, but that's it. All that's needed is the desire to learn more about that camera. I want to teach this person how to "stop time" in ways that makes the average person say WOW!

I am a photographer, who are you?

Thanks for reading!

Brant

Wow, look at you...you made it all the way thru my post! I really appreciate you as a reader. Don't forget to register your email for automatic updates up at the top. Please pass this blog post on to your friends using the Tweet, Facebook, and Google+ buttons. That would be awesome.

Tuesday, June 3, 2014

Example of a Portrait

Summarizing today's post: Traditional portraiture, an example of a portrait, & key vs. fill lighting.
shot at 50mm, ISO 400, f/3.2, 1/250th, 2 strobes at 1/16 pwr

After careful examination and spending countless hours weeding thru all the many, many applications from models all over the world...I have made my final choice. The model I intend to use today as my guinea pig when showing you a classic example of a portrait will be...ME. (My original choice -- my younger brother -- didn't work out, but I'll hog-tie him down later.)

Oh well! You'll just have to suffer thru it (and maybe have a little chuckle at the same time.) Yes, this will be a self-portrait. And as such, a little more challenging because it is always easier (and preferable in my opinion) to shoot someone else rather than shooting yourself self-portrait style. It's time-consuming, and well...I just like being behind the camera like I have said before. But necessity rules the day, so you got me to look at right now.

Okay, remember the last post? (click here) I will be using the same lighting set up shown there as I will in my real-life example today. Here's the details:

I simply put one of my SB-800 flash guns on a stand about 4 feet from myself (this would be to camera-left) at a 45 degree angle. This is my key/main light. I shot it thru a white umbrella to soften the light a bit. (Most often, soft light is the order-of-the-day when it comes to portrait-style photographs.) I then set up another SB-800 off to the other side -- to camera-right -- but set back an additional 3 feet...so we'll say 7 feet from me. This is my fill light.

Once my strobes were all set up, I put my camera on a tripod and aimed it right where I would be standing. I made several test shots until I achieved proper exposure, which was as follows: 

The ISO sensitivity was set at 400 when powering the camera up, so I left it right there and worked with it. I wanted to fuzz my background a bit so I swapped to a "faster" lens that allowed me to set my aperture to a very wide f/3.2. 1/250th of a second shutter speed was an order to cut out all ambient light. Once all set, I focused on the strobes' power setting. 1/4th power...total wash out, 1/8th...better, 1/12th...still to bright. Then I found the perfect setting...1/16th power for the both of them. Slightly overexposed, but that's what I'm aiming for.

Now, you may laugh at how I achieved proper focus, but you have to improvise at times. Being that my aperture was set so wide, the "fuzz factor" (I call it) was large...meaning that only a very small place between the camera and the backdrop was perfectly in focus. That's where my eyes should be. I can't be in front of the camera and focus it from behind the camera it at the same time (unless I want to dig out my remote "clicker", which I didn't). So...I found one of the pussycat's toys laying around that I could attach to the top of the backdrop and let it's little streamer (that the cats love to bat around when you wave it in front of them) hang down right where my forehead would be. Now I had a focal point. [How 'bout that? Those cats are worth something after all.]

After using the self-timer feature and shooting for about 10 minutes, I finally got what I wanted. I picked the photograph where I wasn't looking just but so dang goofy and went with it.

shot at 50mm, ISO 400, f/3.2, 1/250th, key light only

To help illustrate the difference of using fill lighting vs. not using it, I have included another photo using only the key light. Can you tell the difference? Scroll back and forth and see if you can tell what shadows are present this last picture in comparison to the final product up above. 

Look at the left side of my face (the right side of the photograph). Those are the shadows that that the fill light corrects...or fills, just as the name suggests. Pretty neat right?

Okay, enough already. Now you've seen me on my own blog. Next time I hope I can find someone a little better-looking to be my guinea pig.

Play around a bit and see if you can hold a family member still long enough to practice your portrait shots. It really is a very practical skill that you need to master, because it's use bleeds into many other areas of photography that you will see pretty consistently.

Thanks for reading!

Brant

 Wow, look at you...you made it all the way thru my post! I really appreciate you as a reader. Don't forget to register your email for automatic updates up at the top. Please pass this blog post on to your friends using the Tweet, Facebook, and Google+ buttons. That would be awesome.