 |
|
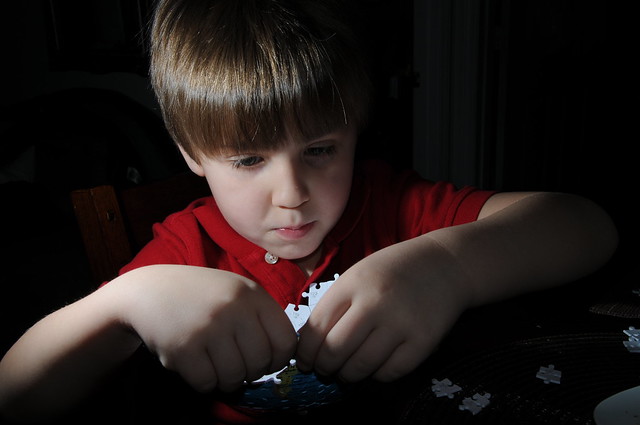
shot
at 27mm, ISO 200, 1/250sec, f/16, flash 1 foot @ 1/32 power zoomed out
to 17mm, held by hand to camera left. Added very low power fill from on
camera flash @ ~1/128 power
|
We have already covered the first aspect of off-camera lighting in our last post, which is the position of your strobe (remember...when off the camera, I refer to the flash as a strobe). The whole idea is to get your main lighting source off-axis from the camera's viewpoint. This kills the whole "snapshot" perception.
Notice I said main lighting source. More on that in a later post.
~~~~~~sidenote~~~~~~
I want to pause for a moment to acknowledge one of my main resources that I refer to often when I want to learn more about lighting with strobes. The off-camera lighting guru of modern-day photography is David Hobby...and he has unselfishly made all kinds of knowledge available (at no charge) to anyone wanting to learn about this topic thru his blog. You can find it at Strobist.com. In fact, over the next few posts, I will be relying on his assignments in what he calls "Lighting 102" as a foundation for my illustrations.
Going thru "assignments" (why does that scare some folks into thinking they're in school again?) helps me to grow my knowledge base. That is why I like to give you examples of my work in each of my blog posts, tell you how I did it, and encourage you to try them in your own way. That's basically an assignment. There are many ways to learn, but I feel the best way is to actually get out there and start doing it. Trial and error...shoot, adjust, shoot again.
~~~~~~sidenote~~~~~~
Yes...angle or position of your strobe--in relation to your lens--is the first thing you will spend hours (or days) on when you discover the awesome world of off-camera lighting. Think of all the ways you can move your strobe around your subject...it's infinite really. Not only can you move it to the right and left, but it can be positioned over or even under the object. Or a combination of the two. One of my favorite positions of a single strobe is to camera left (at approx 45 degree angle) and hovering above my subject a bit. But I am also discovering that I like other lighting angles as well because of the drama it can portray in the image. And there is no right or wrong here...that's what makes this so neat. No one can say..."Hey bud, you're doing that all wrong!". If it looks good to you, then that's all that matters.
The second aspect of off-camera lighting: Distance. Meaning, distance from your lighting source (your flash/strobe) to your subject. The distance from your lighting source to the background comes into play as well. Want to "kill" the background in a picture? This is neat stuff.
Look at the photograph of our Gavin, above. He is concentrating heavily on putting together a 3D globe puzzle (very neat gift idea, by the way, if any of you are planning ahead for birthdays and such!). I just had to grab my camera when I saw how hard he was working at it...he was precious.
What do you notice about the picture immediately? I see two things. First are his hands and face...they just jump out at you. The attention he is pouring into that puzzle is remarkable, and it shows. Now, what don't you see? The background. I took it away. Why did I do this? My reasons were two-fold. Primarily, I wanted Gavin--only--to command your attention. I wanted to "bring him out" of his environment. When I shot this picture I was sitting at our kitchen table. I noticed a lot of clutter behind him (my doing I'm sure...can't blame anyone else) that I didn't want in the frame. So then, the second reason I killed the background is so you wouldn't see my clutter directly behind him.
Now that you know why I did this, the question now is how did I accomplish it?
Very simple. I set my shutter speed at 1/250th of a second, which took away all the ambient light in the room. There was plenty of natural light coming in thru the window about 10 feet away, as it was the middle of the afternoon when I shot this. The next--and most important thing--is this. I held my strobe only about 1 foot away from Gavin's face. It is just outside the left side of the image (I'm surprised that the head of the strobe didn't get caught in the frame actually). With the light right up on him like that I had to crank my aperture down to f/16 to get the proper exposure. Bingo, a nice looking photo.
A couple of things to learn here.
- Light is very powerful up close. And tight. Move it in tight on your subject to eliminate the background. Use it like I did to here to draw the viewer's eyes to the most important part of the photograph.
- Light gets weaker--a lot weaker--as the distance increases from your light source to your subject. Also you loose the "tightness". Not necessarily a bad thing if that's what you want. If I'd moved the same strobe back another 6 feet or so, I would have had to open up my aperture considerably (or increase the strobe's power). Now my background would have shown up.
So cool...this is what you call lighting control. Go play.
Thanks for reading!
Brant
Like it here? Resister your email for automatic updates up at the top. Please pass this blog post on to your friends (if you think they would like to read it) using the Tweet, Facebook, and Google+ buttons.
No comments:
Post a Comment