I love the snow, hence the reason for my last post. Just had to take a break and insert a couple photos (I have many more, but I will spare you). Let's continue with our off-camera topic now...
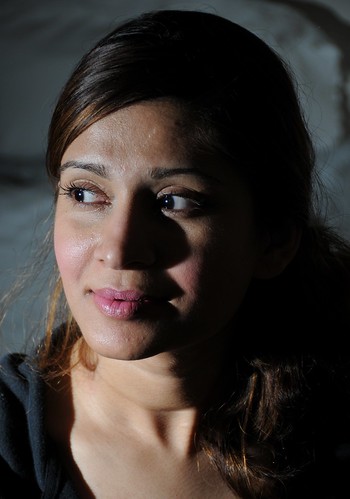 |
| shot at 90mm, ISO 200, 1/250th sec, f/5.3, single strobe 1/32 pwr |
After diving into the world of off-camera lighting, we have looked at the first two areas of interest: Position/Angle of your light source, and Distance of your light source. And what fun we have had. I could do example after example of these two characteristics of lighting alone and keep my blog flowing for a year and never run out of material. But alas, we have to move on so I can cover other things. But don't think you've seen the last of position and distance, I will refer to them all the time!
The third area of interest--when it comes to off-camera lighting--is Size of your light source. And more specifically, how the object or person in the photo perceives the size of that light source. What we are really talking about here is the harshness or softness of light. Generally speaking, the smaller the light source the more harsh (or hard) it is. The larger it is, the softer the light becomes. One is not better than the other, but they have their places.
There are many ways to alter your little off-camera flash to make it appear larger to your subject, and this is an area I love to play with a bit. Let's talk about that a minute...
Hmmm...inexpensive ways to make your little flash (strobe) appear larger:
- Bouncing the light off of a nearby wall or ceiling. This can take your little 1" by 2" flash head and turn it into a HUGE light source. (I did just this in my last photograph shown here.)
- Shoot your strobe thru a piece 8 1/2" x 11" white paper. Want larger? Tape 4 pieces together.
- Shoot thru a shower curtain, bed sheet, white trash bag...you name it. You are limited only by your imagination.
- Get a softbox to hook to the end of your strobe. You will get a very nice look with controlled results. You can buy softboxes in compact 15" x 15" sizes, right on up to 60" x 60" and even larger. They can be a little pricey however.
- Use umbrellas. These are the best option for the amateur (in my opinion) who wants to spend a few dollars on professional equipment without breaking the bank. You can shoot thru them (best) or bounce light off of them when flipped around. A nice white umbrella can be purchased for about $20 and will do whatever you need it to.
Okay, let's move on...
When an object (let's say an apple) is in the presence of a light source (let's say the morning sun shining thru the kitchen window) there are places on the surface that "see" the light, and places that don't. In our example, the front side of the apple (facing the window) receives all the light, head-on. The back side of apple doesn't "see" the sun. This is the shadow side of course. But what about the sides of the apple? Ah, this is what I'm talking about. There is fancy term for this area, but I won't bore you with that. It's basically the area that fades from light to dark. I refer to it as the light-to-shadow-transfer-area. And by looking at this part of the object, you can determine what size the light source is.
Can you look at a photograph and determine the size of the light source used? Sure you can. Look at the first photo of Pinky the top of this post. In this first shot I have the strobe off to camera left 6 feet away, just about at 90 degrees, and placed it a little ways up (maybe 15 deg) so the light is coming down on her. I have done this deliberately so you can see the the "fall-off" area of the light better. [In a "normal" portrait the strobe is placed about at about 45 degrees over and situated up another 45 degrees or so. Define normal...hmmm. Another topic.]
Notice the obvious lit parts of her face. Now look at the shadow area on the left side of her head not being hit by the light at all. Pretty drastic right? You can see defined shadow lines. That's its because this is hard light coming from a small light source. I deliberately did not allow any other light in the picture to come into play here so that you could see what one single (small) light source would do. I like using hard light a lot of the time and in this photograph it highlights my wife's beautiful facial features in a dramatic way. Introducing drama in photography is so fun. It really sets your images apart.
 |
| shot at 75mm, ISO 200, 1/250th sec, f/5, strobe facing wall, 1/4 pwr |
Notice the the left side of her face? Hardly any shadows at all. They're still there, but very subtle. And there is a very broad light-to-shadow-transfer-area between the lit area and the shadow areas. (Take note that the two areas will always be there in some form or fashion.) This is the very definition of soft light in my book.
What I want to emphasize to you is this: To really control your light-to-shadow-transfer-area, it's not about the actual size of the light source in inches (or whatever units of measurement). It's about how close you place that light source to your subject. You can have a huge light source, but if it's placed far away, it will still appear harsh. If light softness is desired (and I define softness as having a broad light-to-shadow-transfer-area), then your light needs to be placed really close up to the subject/object. But...it doesn't have to be close (like in the second photograph of Pinky above) if the light source is so big. It is all relational. If softness is desired and a relatively small light source is used (like shooting thru a piece of copy paper), then yes...you will have to be pretty close to your subject. If your light source is huge (such in my example), you can have it much farther away and still achieve softness.
Pretty neat, right?
I could go on and on...but I will quit for today. Which photograph of Pinky do you like better? (Hint...there's no right answer.)
Thanks for reading!
Brant
Wow, you made it all the way thru my post! I really appreciate you as a reader. Don't forget to register your email for automatic updates up at the top. Please pass this blog post on to your friends using the Tweet, Facebook, and Google+ buttons. That would be awesome.
No comments:
Post a Comment