Make sure you sign up on my mailing list (just below on the right) before you leave! Your address is SUPER safe with me.

Friday, May 23, 2014

Fill Lighting in Portraiture

Summarizing today's post: Traditional portraits, key vs. fill lighting, & a bit on the evolution of photography.

Let's talk a little more about multiple strobes. In this case, we are going to take fill lighting to another plane. More specifically, I will show you the best way to take a nice photograph in a traditional, portrait-like setting. 

Now, let me take you back in time a bit. Back in the day of 35mm film cameras (remember those?) -- before everyone had digital cameras and smartphones -- photography was different. When someone thought about a "photographer", most thought of the guy or gal in a traditional studio setting who did nothing but take portraits all day long. While portraiture is still a large part of the photography industry, the digital revolution -- which really took off about 15 years ago (but was actually started by Kodak in the mid-70s, believe it or not) -- has changed the definition of what professional photography is. 

If I had to sum up the definition of modern-day photography in one word, I would have to say... creativity. With a powerful digital camera in your hand, the sky is truly the limit in terms of what you can shoot. There are plenty of photographers out there today who make their living without stepping foot into a traditional studio setting. 

Now that everyone has a digital camera in their pocket, a lot of folks do not see the need for professional portraits. We are always snapping pictures of our friends and family all the time. However, portraiture is still an important skill to master, despite the dwindling demand in the modern world. And if you are trying to hone your skills as a photographer, you need to learn how to take an awesome portrait. If people know that you are proficient with a camera, there will be times someone will ask you to take a nice photograph of them. So I will show you what I have learned over the the last few years when it comes to taking a portrait.  
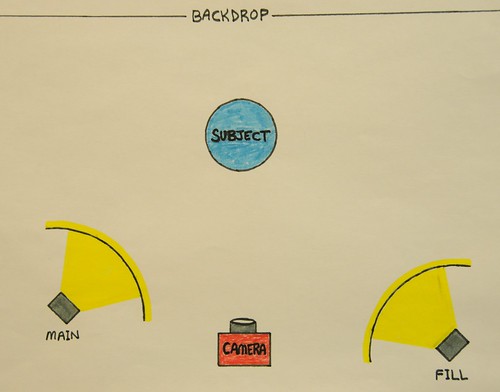

Key/Main light and Fill light position in relation to your camera and subject
First, let's talk set up. (This is where it all ties in with what we have been talking about, especially when in comes to fill lighting.) We are using a 2 light system...a key/main light, and a fill light. Here is a CRUDE drawing (this is why I stay behind a camera when it comes to demonstrating my artistic ability) I penciled to demonstrate the best way to position your lights/strobes. Your key light will be to camera left at a 45 degree angle and "looking" down on your subject (person or object you are shooting) a bit...not much, maybe at 30 degrees or so if you want to get technical. Notice in the image above that it is placed closer to the subject than the other strobe. The fill light is placed farther back and is at the same 45 degree angle, but not placed as high up as the key light (maybe at 10-15 degrees). In my drawing, I am using 2 simple strobes (off-camera flashes) fired into umbrellas to soften the light. Both strobes will be set at the same power. With the main light placed closer it will be providing the most light, giving dimension to your subject. The fill light be there to soften the shadows cast by the main light.In my next post, I will go into detail a little more and I will provide a real life example of a portrait. For now, let this sink in and play around with it a bit with your own equipment.Thanks for reading!Brant Wow, look at you...you made it all the way thru my post! I really appreciate you as a reader. Don't forget to register your email for automatic updates up at the top. Please pass this blog post on to your friends using the Tweet, Facebook, and Google+ buttons. That would be awesome.       

No comments:

Post a Comment