 |
| 50mm, ISO 400, f/2.8, 1/60th sec, ambient & artificial lighting |
Now that I've touched a bit on what it is I am doing here -- my purpose so-to-speak -- let's get back to lighting.
Using two off-camera strobes is my personal lighting of choice, as in my self-portrait (shown here). One to camera left, the other to camera right. The key light is the muscle -- illuminating the scene with the majority of the usable light -- and the fill light is there softening the shadows cast by my key light.
I've tried in the past to give a little encouragement to those who do not have but one off-camera flash at this point in their collection. Gear is expensive (I realize) and I want you to learn everything you can about one piece of equipment before you go spend more on something else. As I have said before...I could keep myself busy for a long, long time with just a single strobe.
Now, as promised, I will demonstrate how you can make that one little strobe go further. It's all about using what is already there...good quality ambient light. And striking a balance. It's all about balancing light...or leveraging light. (We'll talk a bit more on leveraging light next time.)
What you have seen me do the most in past posts -- when it comes to adding my own light with strobes -- is to "cut out" or "turn off" all ambient light before doing anything else. I do this by working indoors and setting my camera to a fast shutter speed (most often to 1/250th of a second).
Why do this? Two reasons. To make a point with the lighting set up I am demonstrating at the time (the main reason), and two, most indoor lighting stinks when it comes to using it in your photograph. The light is either too yellow (projected by incandescent lamps) or too green (thrown off my fluorescent lights). So off with you! (I think its so neat that you can "turn off" the light you don't need without going over to the light switch...but that's just me.)
Now we are going to switch gears and move outdoors. True, you can take some good shots indoors using only one strobe, but in my opinion you get the best results by mixing controlled artificial light with available light. And the best available (ambient) light is found outside...in the shade.
So let's go, grab your camera and your one strobe and find yourself a nice shady spot outside. The best time of day to shoot in our case is going to be right after sunset, but as long as you can find an abundance of shade (say under the covering of some thick trees) you can do this even during the middle of the day. We are looking for that pure "white light" to use as our ambient, natural light.
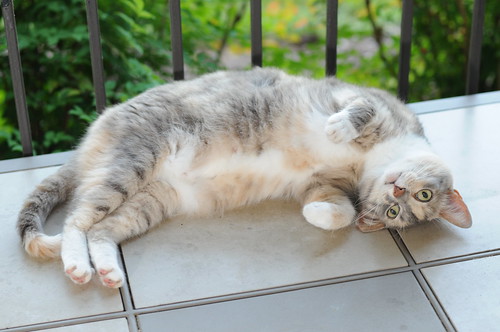
I am using Spooky as my subject today. Such a sweet pussy cat...she's all into what ever I am doing outside at the time. You saw the finished product up above, but let's see where I started first.
 |
| shot at 50mm, ISO 400, f/2.8, 1/80th of a sec, natural outdoor lighting just after sunset |
Let's bring out my little SB-800 strobe and lighten her a little.
 |
| shot at 50mm, ISO 400, f/2.8, 1/60th of a sec, strobe to camera left added, set at 1/128th power |
Now I'm satisfied. All the colors of her coat are shining bright. Beautiful.
This is balancing light. This is how to make ambient/natural light work for you. Go try it for yourself and have some fun.
Thanks for reading!
Brant
Wow, look at you...you made it all the way thru my post! I really appreciate you as a reader. Don't forget to register your email for automatic updates up at the top. Please pass this blog post on to your friends using the Tweet, Facebook, and Google+ buttons. That would be awesome.
No comments:
Post a Comment