 |
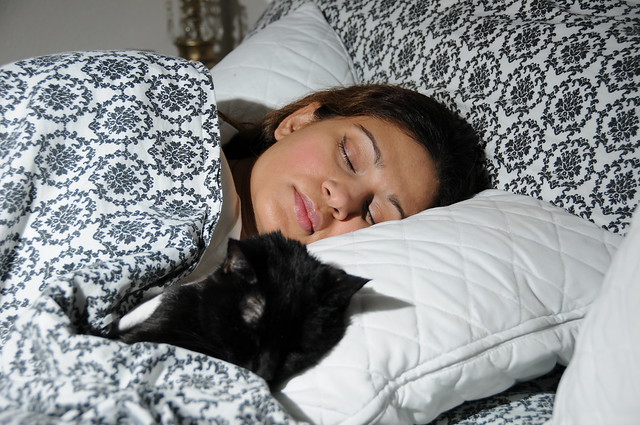
| shot at 46mm, ISO 200, f/4.5, 1/250th of a sec, strobe 3ft way, 1/64 pwr |
It was a lazy Sunday. Not too many times my wife and I have the same day off together...and we made the best of it. Lazing around, snuggling up with the pussycats, and watching movies was the order of the day. When I saw Pinky and Penelope all wrapped up together in bed -- in the middle of the day, mind you -- well, you know me...I had to capture the moment.
I wanted to upload a couple of photos today to give you another example of how to use your on-camera flash (the only time I suggest you use that little built-in flash you've got) as fill lighting. Nothing new today, just going a little further with my last post "Key vs. Fill Lighting" (see here).
So back to Pinky and Penelope.
The first picture I took (which is not shown here) was with ambient lighting only just to see what I could get. There is a window right beside the bed which was pouring in right much light (it really was the middle of the day). With my shutter speed set at a 13th of a second (pretty slow) while at ISO 200, I could obtain the proper exposure. The problem was this...they were not facing the window, hence Pinky's face was too dark, and the kitty cat was in the shadow of the bed sheet. Bummer. What to do?
I could have done several things (always nice to have the ability to utilize multiple solutions to your lighting problems just in case one doesn't produce the desired results). But what did I do? Well, I used this priceless opportunity to expound a bit on our topic at hand of course!
First, I "turned off" the ambient light. How did I do that? Did I close the blinds? Nope. I simply cranked up my shutter speed to 1/250th of a second. I clicked a test shot, and sure enough everything was almost completely black. Now I had complete control to use my own light sources. [This is why I encourage you to use the manual controls on your camera because it allows YOU to decide how to solve your problems the way YOU want. Neat.]
Next, I set up a strobe to camera left about 3 feet away and set it on 1/64th power capacity. I used nothing to soften the light, just used the bare flash head. (I did this because I wanted those hard shadow lines to appear to show you what I am about to "fix".) Okay, first photo (above) looks good, properly exposed at an aperture of f/4.5.
Now, in any setup like this -- with one small, hard light source -- you inevitably are going to have a lot of contrast in your photo. What I mean by that is dark shadows will be there. Contrast is okay at times if that's the look you are going for. Most times however, you'll want to soften those shadows a bit. Time to problem-solve. The easiest way I can think of to lessen those dark areas is utilize our new-found knowledge of fill lighting!
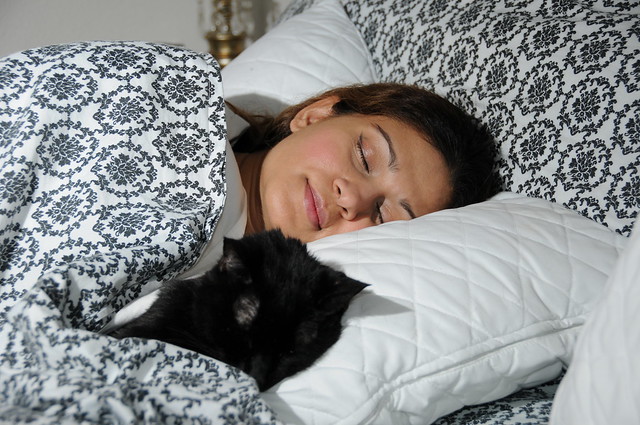 |
| shot at 48mm, ISO 200, f/4.5, 1/250th of a sec, fill added at 1/64 pwr |
So what's different? Well, two things...only one is a result of my fill lighting. Pinky is now smiling at me because she realizes I am taking pictures of her (oh, "there he goes again"). That's the first. The other thing that's different is the contrast in the photo has been taken down a bit, which is what I'm after. The main two points of reference where this can be noticed: the shadows cast on the pillow by Penelope's ear, and also the one cast by sheet just below Pinky's chin. Those shadows, while still there, are softened. Not as hard. Look back and forth at the two photographs and you'll see the difference. Nice, this is what I'm after.
Fill lighting is an awesome solution to the "shadow problem". It allows you to move your main light source off-axis from your camera (in order to give your subject that real-life 3 dimensional look) without creating a large amount of contrast in your final photograph. And what I have found over and over again -- when in it comes to adding my own light -- is this: THE way to make a so-so picture into a professional-looking photograph is to move that main light (the key light) off to one side or another in relation to your camera's viewpoint. You will hear me say that again and again.
Now, can you think of another way I could have solved my lighting problem in this situation? Yes you can I'm sure. Here's one: If you'll go re-read my post on March 20th -- "My Lovely Wife" (see here) -- you'll find that those same principles could have been applied here. By increasing the apparent size of my light source I could have lessened those dark shadow areas as well, reducing the overall contrast.
I hope you now can see the benefit of using fill lighting in your setup. It's just one of the many tools you should be able to utilize if the situation justifies it.
If nothing else, I hope that by looking at these two photographs you are ready to have a "Lazy Day" yourself. They are priceless...and rare. And that is why I had to capture it.
Thanks for reading!
Brant
Wow, look at you...you made it all the way thru my post! I really appreciate you as a reader. Don't forget to register your email for automatic updates up at the top. Please pass this blog post on to your friends using the Tweet, Facebook, and Google+ buttons. That would be awesome.
No comments:
Post a Comment