 |
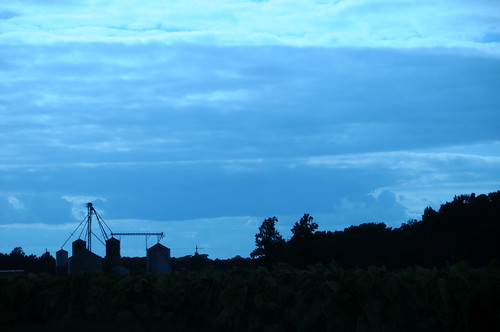
| 90mm, ISO 200, f/5.6, 1/1600th of a sec, WB set to tungsten |
Worse than the expense, it takes precious TIME to edit your photos. Time is a commodity many do not have extra to spare these days.
I have used Photoshop and other image editing programs, but what I find is that I reap much more enjoyment out of taking the photograph, rather than being in front of a computer screen. Software editing (although sometimes it's inevitable to save an otherwise bad image) is work, shooting is not...that's the fun part.
In addition to it simply being fun, I find it to be a challenge to capture an image correctly the first go-round...while in the process of taking the photo. It's more natural--more realistic--this way as well. Does it take a little more effort? Yes, but it's a learned process. It's also the reason I encourage shooting by using the manual controls on your camera when possible. (For more on shooting manually, see here.)
I will get off of my soapbox about Photoshop. Bottom line? Leave Photoshop to the professional photographer.
So having talked about "capturing an image correctly", what about altering an already "correct" image? [Correct meaning perfect exposure, good lighting, subject/object situated just right, etc.] Afterall, photo editing is used just as much to alter a correct image (to make it more interesting) as it is to try and save an incorrect, flawed one.
Let's get into some interesting ways to alter a plain-looking image while you are still standing in front of it. One easy way to make a photo look more interesting is to change the color tone. Let's talk about white balancing a bit.
You can really get into some technical jargon when talking about white balancing (WB), so I am going to spare you the details. The main thing to know is that by selecting different white balancing settings, you can change the mood of a photo quite drastically. Most often, you will find your WB setting already set on AUTO in your camera.
Mine was, when shooting the photo above...and I didn't like it. I decided to play a bit. I set the WB setting to "tungsten" and shot again. It's still not the perfect image (I was being picky that day), but by shifting to tungsten it gave the color tone a very blue feel. It took the cloudy sky over that tobacco field and gave it a completely different look. Pretty neat.
The "tungsten" white balance setting is like that. It will always make your images more blue and give it a cool feel. Other WB settings?
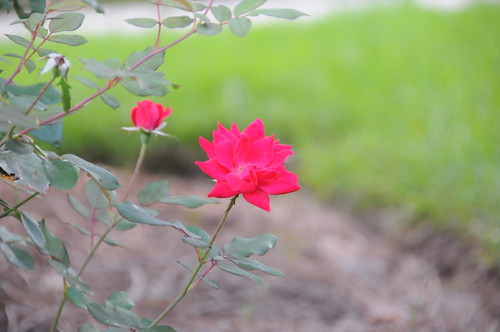 |
| 200mm, ISO 800, f/5.6, 1/20th sec, ambient only, WB set to Auto |
Take a look at the photograph at the left. I first shot this pretty little flower at AUTO. Not bad...good enough to show you even. However it wasn't "warm" enough for me. This was because I was shooting in low light at the end of the day (the sun had long ago set).
So to warm the image up a bit, I took the white balance setting off of AUTO and selected "shade" instead. Here's what I got:
 |
| shot at 200mm, ISO 800, f/5.6, 1/20th of a sec, ambient light only, WB set to shade |
So there you have it. An intro to White Balance. There are other WB settings you can play with too, such as "sunlight", "cloudy", and "fluorescent". However, I have showed you the most drastic of the bunch today. The point is, take it off AUTO and experiment.
Remember... "tungsten" to make your image more blue and give it a cool feel, and "shade" to make your image more orange and give it a warm feel.
Go play, and leave Photoshop alone.
[Note: This is part 1 of using white balance to your advantage. Next time, I will touch on using this same in-camera adjustment to make an image look better INDOORS.]
Thanks for reading!
Brant
Wow, look at you...you made it all the way thru my post! I really appreciate you as a reader. Don't forget to register your email for automatic updates up at the top. Please pass this blog post on to your friends using the Tweet, Facebook, and Google+ buttons. That would be awesome.
No comments:
Post a Comment