Make sure you sign up on my mailing list (just below on the right) before you leave! Your address is SUPER safe with me.

Friday, May 23, 2014

Fill Lighting in Portraiture

Summarizing today's post: Traditional portraits, key vs. fill lighting, & a bit on the evolution of photography.

Let's talk a little more about multiple strobes. In this case, we are going to take fill lighting to another plane. More specifically, I will show you the best way to take a nice photograph in a traditional, portrait-like setting. 

Now, let me take you back in time a bit. Back in the day of 35mm film cameras (remember those?) -- before everyone had digital cameras and smartphones -- photography was different. When someone thought about a "photographer", most thought of the guy or gal in a traditional studio setting who did nothing but take portraits all day long. While portraiture is still a large part of the photography industry, the digital revolution -- which really took off about 15 years ago (but was actually started by Kodak in the mid-70s, believe it or not) -- has changed the definition of what professional photography is. 

If I had to sum up the definition of modern-day photography in one word, I would have to say... creativity. With a powerful digital camera in your hand, the sky is truly the limit in terms of what you can shoot. There are plenty of photographers out there today who make their living without stepping foot into a traditional studio setting. 

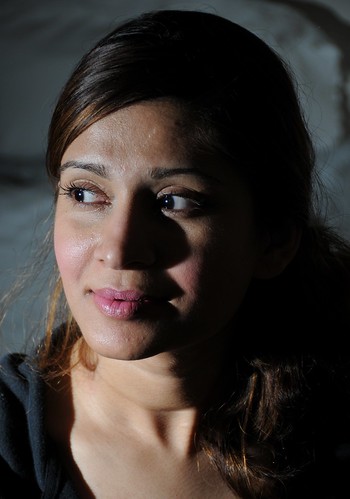
Now that everyone has a digital camera in their pocket, a lot of folks do not see the need for professional portraits. We are always snapping pictures of our friends and family all the time. However, portraiture is still an important skill to master, despite the dwindling demand in the modern world. And if you are trying to hone your skills as a photographer, you need to learn how to take an awesome portrait. If people know that you are proficient with a camera, there will be times someone will ask you to take a nice photograph of them. So I will show you what I have learned over the the last few years when it comes to taking a portrait.  


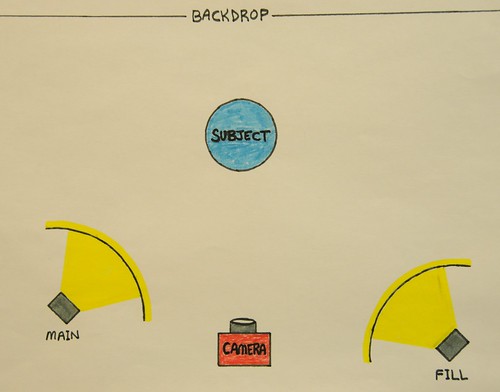
Key/Main light and Fill light position in relation to your camera and subject
First, let's talk set up. (This is where it all ties in with what we have been talking about, especially when in comes to fill lighting.) We are using a 2 light system...a key/main light, and a fill light. Here is a CRUDE drawing (this is why I stay behind a camera when it comes to demonstrating my artistic ability) I penciled to demonstrate the best way to position your lights/strobes. Your key light will be to camera left at a 45 degree angle and "looking" down on your subject (person or object you are shooting) a bit...not much, maybe at 30 degrees or so if you want to get technical. Notice in the image above that it is placed closer to the subject than the other strobe. The fill light is placed farther back and is at the same 45 degree angle, but not placed as high up as the key light (maybe at 10-15 degrees). In my drawing, I am using 2 simple strobes (off-camera flashes) fired into umbrellas to soften the light. Both strobes will be set at the same power. With the main light placed closer it will be providing the most light, giving dimension to your subject. The fill light be there to soften the shadows cast by the main light.In my next post, I will go into detail a little more and I will provide a real life example of a portrait. For now, let this sink in and play around with it a bit with your own equipment.Thanks for reading!Brant Wow, look at you...you made it all the way thru my post! I really appreciate you as a reader. Don't forget to register your email for automatic updates up at the top. Please pass this blog post on to your friends using the Tweet, Facebook, and Google+ buttons. That would be awesome.       

Friday, May 9, 2014

Easter Sunday: Using Soft Light In Practical Situations

130mm, ISO 200, f/5.6, 1/250th, strobe 1/2 pwr,
Summarizing today's post: Capturing family memories, off-camera (soft) lighting, & a few photo tips for practical situations.

Easter memories always bring me to a happy place. As a young boy we have always celebrated this happy occasion with family get-togethers. This tradition has stayed the same throughout my lifetime in fact. As life happens and schedules change, the number of family members who can come home varies. But we always get together one way or another to celebrate and remember that Jesus Christ has risen from the dead so many years ago.


This year, Easter Sunday was a little different because it was raining outside. But we made the best of it, having a family day indoors. It all worked out very nicely and we had a wonderful time. I (of course) brought along my camera to capture a few of these memories.

I'm going to sidetrack today and share some photographs I took of my family enjoying themselves on this special day. We'll get back to the topic of using multiple strobes later on, I promise. 

This is an important post for you guys who want to actually apply some of the principles that we have talked about thus far in a real-world application. Mainly, I wanted to show you what I do in lieu of taking outright snapshots. This little trick works superb for indoors...read on.

Okay, first shot (above) is of our little boy walking into Grandma and Granddaddy's kitchen and seeing what they got him for Easter. Look at the expression on his face! My God it was absolutely priceless. I knew that there would only be about 2.5 seconds that I  would have to take a photograph of him before he grabbed up his goodie bag, so I wanted to be ready.

I had a single (bare) strobe set on the kitchen table off to the left and pointing straight up at the ceiling. This created a huge light source right above him (remember apparent light size?). I had already taken a couple of test shots to adjust the power of my light to 1/2. This rather high power was necessary for 2 reasons. I had the ISO sensitivity on my camera set at a low 200 (I wanted the best quality photo) and also I was using indirect lighting (bouncing light off the ceiling). Set up, I was ready. Shot #1 a success!

shot at 70mm, ISO 200, f/5, 1/250th, strobe at 1/2 pwr
Shot #2 was -- quite literally -- just a few seconds later. Gavin had picked up his bucket of candy and money and was clutching it to his chest. Precious. How can you NOT smile at this picture? Makes you remember when you were a little one yourself I bet. 

I was able to capture this image because he and I were positioned very close to where we were in the first photograph, so no changes were necessary in settings. If he had of walked to the other side of the kitchen -- or even a few feet away -- I would have had to adjust a few things (namely, where I had my strobe situated).

This setup works very well in indoor applications where the people who you are shooting are in relatively close proximity to one another. When you set your shutter speed to 1/250th of a second, you quickly make your strobe the only light source that contributes light to your frame. That gives you, the photographer, control. And easy? Once you have your settings where you want them, it is just as easy as taking snapshots...except the quality of the image is so much better. 

Here are a few more photographs I took on this special day. Note that the only thing I did different when I moved around the room (or when moving out on the porch) is tone down the power on my strobe from 1/2 to 1/2.5 to adjust for more light colored (reflective) surfaces in the room. And then all I had to remember is to place it (my strobe) somewhere between me and the person who I was shooting.

At left below, my Mom & Dad. They are laughing about something or another! At right is my pretty wife and baby brother (not so baby...he's taller than me!)

52mm, ISO 200, f/4.8, 1/250th, strobe 1/2.5 pwr
40mm, ISO 200, f/4.5, 1/250th, strobe 1/2.5 pwr


40mm, ISO 200, f/4.5, 1/250th, strobe 1/2.5 pwr
Lastly, here are a couple of photos of my parents and Gavin playing around on the porch just before having to head back home. Priceless. 

The only real lighting difference on these last two, is that I placed my strobe on the right (camera right, that is) instead of the left. It's still pointing straight up, illuminating the whole ceiling just above them. One big, huge light source. Nice and soft.

 
35mm, ISO 200, f/4.5, 1/250th, strobe set at 1/2.5 pwr

It's actually pretty amazing that we got Gavin to sit still long enough for a picture, being he was so wound up on candy (and just the thrill of the day in general). It didn't last long tho, as you can see in the this last one.

"Got to go", he says!

What a nice day, as short as it was. Family is so important to me. Sometimes we take each other for granted, and that should not be. I challenge you to tell that special family member that you love them today.

Thanks for reading!

Brant

Wow, look at you...you made it all the way thru my post! I really appreciate you as a reader. Don't forget to register your email for automatic updates up at the top. Please pass this blog post on to your friends using the Tweet, Facebook, and Google+ buttons. That would be awesome.

Tuesday, April 22, 2014

Lazy Day: Key vs. Fill Lighting (Continued)

shot at 46mm, ISO 200, f/4.5, 1/250th of a sec, strobe 3ft way, 1/64 pwr
Summarizing today's post: Off-camera lighting, adding fill lighting to your key light, & solving problems with contrast.

It was a lazy Sunday. Not too many times my wife and I have the same day off together...and we made the best of it. Lazing around, snuggling up with the pussycats, and watching movies was the order of the day. When I saw Pinky and Penelope all wrapped up together in bed -- in the middle of the day, mind you -- well, you know me...I had to capture the moment.

I wanted to upload a couple of photos today to give you another example of how to use your on-camera flash (the only time I suggest you use that little built-in flash you've got) as fill lighting. Nothing new today, just going a little further with my last post "Key vs. Fill Lighting" (see here).

So back to Pinky and Penelope. 

The first picture I took (which is not shown here) was with ambient lighting only just to see what I could get. There is a window right beside the bed which was pouring in right much light (it really was the middle of the day). With my shutter speed set at a 13th of a second (pretty slow) while at ISO 200, I could obtain the proper exposure. The problem was this...they were not facing the window, hence Pinky's face was too dark, and the kitty cat was in the shadow of the bed sheet. Bummer. What to do?

I could have done several things (always nice to have the ability to utilize multiple solutions to your lighting problems just in case one doesn't produce the desired results). But what did I do? Well, I used this priceless opportunity to expound a bit on our topic at hand of course!

First, I "turned off" the ambient light. How did I do that? Did I close the blinds? Nope. I simply cranked up my shutter speed to 1/250th of a second. I clicked a test shot, and sure enough everything was almost completely black. Now I had complete control to use my own light sources. [This is why I encourage you to use the manual controls on your camera because it allows YOU to decide how to solve your problems the way YOU want. Neat.]

Next, I set up a strobe to camera left about 3 feet away and set it on 1/64th power capacity. I used nothing to soften the light, just used the bare flash head. (I did this because I wanted those hard shadow lines to appear to show you what I am about to "fix".) Okay, first photo (above) looks good, properly exposed at an aperture of f/4.5. 

Now, in any setup like this -- with one small, hard light source -- you inevitably are going to have a lot of contrast in your photo. What I mean by that is dark shadows will be there. Contrast is okay at times if that's the look you are going for. Most times however, you'll want to soften those shadows a bit. Time to problem-solve. The easiest way I can think of to lessen those dark areas is utilize our new-found knowledge of fill lighting!

shot at 48mm, ISO 200, f/4.5, 1/250th of a sec, fill added at 1/64 pwr
Second shot. With everything else the same, I have added a little fill lighting using my small, built-in, on-camera flash, set also at 1/64th power.

So what's different? Well, two things...only one is a result of my fill lighting. Pinky is now smiling at me because she realizes I am taking pictures of her (oh, "there he goes again"). That's the first. The other thing that's different is the contrast in the photo has been taken down a bit, which is what I'm after. The main two points of reference where this can be noticed: the shadows cast on the pillow by Penelope's ear, and also the one cast by sheet just below Pinky's chin. Those shadows, while still there, are softened. Not as hard. Look back and forth at the two photographs and you'll see the difference. Nice, this is what I'm after.

Fill lighting is an awesome solution to the "shadow problem". It allows you to move your main light source off-axis from your camera (in order to give your subject that real-life 3 dimensional look) without creating a large amount of contrast in your final photograph. And what I have found over and over again -- when in it comes to adding my own light -- is this: THE way to make a so-so picture into a professional-looking photograph is to move that main light (the key light) off to one side or another in relation to your camera's viewpoint. You will hear me say that again and again.

Now, can you think of another way I could have solved my lighting problem in this situation? Yes you can I'm sure. Here's one: If you'll go re-read my post on March 20th -- "My Lovely Wife" (see here) -- you'll find that those same principles could have been applied here. By increasing the apparent size of my light source I could have lessened those dark shadow areas as well, reducing the overall contrast.

I hope you now can see the benefit of using fill lighting in your setup. It's just one of the many tools you should be able to utilize if the situation justifies it.

If nothing else, I hope that by looking at these two photographs you are ready to have a "Lazy Day" yourself. They are priceless...and rare. And that is why I had to capture it.

Thanks for reading!

Brant

Wow, look at you...you made it all the way thru my post! I really appreciate you as a reader. Don't forget to register your email for automatic updates up at the top. Please pass this blog post on to your friends using the Tweet, Facebook, and Google+ buttons. That would be awesome.


Wednesday, April 9, 2014

Key vs. Fill Lighting

shot at 44mm, ISO 200, f/8, 1/125th of a sec, bare strobe left 3 ft away, 1/32 pwr
Summarizing today's post: Off-camera lighting in photography, adding fill light to your key light, & shooting in manual mode.

Now that we've looked at some of the benefits of off-camera lighting, lets go a little further. I want to introduce the idea of using multiple strobes. This is a very interesting way to shoot...one of my favorites. We'll start simple, then expound a bit in later posts. 

So when is it a good idea to introduce another strobe into your setup?

It's a good idea to add a second strobe when you want little patches of controlled light in your frame. It allows you to light multiple sides of your subject without "blowing out" one side to light the other. It also allows you light on multiple planes, such as highlighting something in the background that you want to add emphasis to. But the most simple reason to add another light source is to lighten the shadows a bit on your subject. This is called "fill lighting".

~~~~~~sidenote~~~~~~
I know what you are thinking. Geez...I've got to buy another flash now? Crap. But don't stress out, you can wait a while. Ask Santa for it. In the meanwhile, you can keep yourself busy (for a lifetime really) with that one strobe of yours, I promise. You can always use another light source as your second strobe until you get one. How? Use your imagination! Need some help? Stay tuned for my next post to give you one idea. 
~~~~~~sidenote~~~~~~

So, in my setup today we have 2 light sources. The main one will be called the "key light", which is my main light...the source throwing the most light onto the scene. And for that, I am using my trusty SB-800 Nikon off-camera strobe. The other light source, the "fill light", will simply be my on-camera flash.

Look at the photograph above. This is a picture of a precious little house plant my mom gave us a couple of years ago that we have tried hard to nurture. (Hard to imagine I would call home from work and ask my wife... "have you watered the plant lately?"...but it happens.) Anyway, back on track. 

This photo was taken with only one light source first to prove a point. After setting the shutter speed fast enough to cut out any ambient light (at 1/125th of a second), I took the shot with my strobe to camera left, positioned about 3 feet away. This was a bare flash set at 1/32 power and nothing used to soften it (like an umbrella for example). So what you see is a hard light with hard shadow lines. Kind of nice and moody actually, but not what I'm after here. I want to bring out the leaves in the background a bit. 

shot at 44mm, ISO 200, f/8, 1/125th of a sec, adding on-camera fill, 1/32 pwr
Here is the second photograph using my on-camera flash as fill. It is set at manual 1/32 power as well. With every thing else exactly the same, you can now see the detail in the leaves much better. Nice.

Always remember that the way to a quality photo is to position your main light source (the key light) so it illuminates off-axis in relation to the camera, as we have discussed in previous posts. In other other words, don't ever make your on-camera flash your key light. You can use it as a fill light if necessary, but that's it. What's the result if you do use it as your key light? S-N-A-P-S-H-O-T. Snapshots have their place (as I have stated before), but I want you to avoid taking them when ever possible, and time allows. 

By definition, your fill light will be less powerful than your key light. What you are after is for the fill light to soften the shadows a bit, not blow-out and overexpose the areas that the key light is already illuminating. If you are paying attention, you will notice that both my key and fill lights were set at the same power (1/32), so what's up with that? Simple explanation. My fill light is on-camera, and my camera was set back further (approx 5 feet away) than my key light. Remember, your light source increases with intensity exponentially as you place it closer to your subject.

Hope all this makes sense. Play a little. I will submit another example using on-camera fill in my next post to help.

Thanks for reading!

Brant

Wow, look at you...you made it all the way thru my post! I really appreciate you as a reader. Don't forget to register your email for automatic updates up at the top. Please pass this blog post on to your friends using the Tweet, Facebook, and Google+ buttons. That would be awesome.
 

Tuesday, March 25, 2014

Morning Sky

shot at 65mm, ISO 400, 1/160th of a sec, f/5
Summarizing today's post: Sunrise photography, adjusting your camera settings manually, & appreciating the small things.

Before introducing the next topic of discussion I must pause for another moment to show you this photograph.

(You will find me doing this all the time because things simply catch my attention and get me off track...and I must share.)

One morning a couple of weeks ago I had gotten up from a good night's sleep and was fixing a pot of coffee (an absolute necessity for me) when something caught my eye out the patio window. I usually get up well before sunrise, but that morning I slept in because the workweek had taken its toll on me. 

What caught my attention, even before a drop of caffeine entered my body, was the sunrise over the trees. More specifically, it was the sun bouncing off of the clouds before it actually had shown itself. And I swear the clouds were pink. It was such a pretty sight I just had to grab my camera (of course) and start shooting.

I wanted to see if I could capture all that beauty before the color bouncing off the clouds had dissipated. Whenever you see a sight like this--and you DO notice things like this, right?--you have to take it in right that moment because it doesn't last long. The rich pink color had already started to fade during the length of time it took me to walk to the bedroom and pull my camera out of it's bag. I had to act quick. 

Using only available light here. I adjusted my camera to a sensitivity of ISO 400. Aperture wide open (as far as my lens would allow) at f/5. Then all I had left was shutter speed. I chose to underexpose by just a little at 1/160th of a second (see how dark the treetops are?) to show a richer color in the clouds. A properly exposed image would have washed out the deep pink and purple colors I was trying to show.

Beautiful.

Take a look at your surroundings today and when you find something of beauty (and there are things all around you)...pause oh-so-briefly and take it in. Life and all its clutter and hustle will be right there 10 seconds later.

Thanks for reading!

Brant

Wow, look at you...you made it all the way thru my post! I really appreciate you as a reader. Don't forget to register your email for automatic updates up at the top. Please pass this blog post on to your friends using the Tweet, Facebook, and Google+ buttons. That would be awesome.

Thursday, March 20, 2014

My Lovely Wife

Summarizing today's post: Hard vs. soft light in photography, size of your light source, altering your flash/strobe to achieve dramatic results, off-camera lighting, portraits.

I love the snow, hence the reason for my last post. Just had to take a break and insert a couple photos (I have many more, but I will spare you). Let's continue with our off-camera topic now...

shot at 90mm, ISO 200, 1/250th sec, f/5.3, single strobe 1/32 pwr
After several posts of our son Gavin, and of our pussy cats, I am now going to introduce my wife, Pinky, into this section. I am picking up on a vibe here... "Why haven't you included me in your blog?", she is thinking. No...I am kidding. She is very good-natured and supportive, I just like to mess with her. We have to have fun and laugh, right?

After diving into the world of off-camera lighting, we have looked at the first two areas of interest: Position/Angle of your light source, and Distance of your light source. And what fun we have had. I could do example after example of these two characteristics of lighting alone and keep my blog flowing for a year and never run out of material. But alas, we have to move on so I can cover other things. But don't think you've seen the last of position and distance, I will refer to them all the time!

The third area of interest--when it comes to off-camera lighting--is Size of your light source. And more specifically, how the object or person in the photo perceives the size of that light source. What we are really talking about here is the harshness or softness of light. Generally speaking, the smaller the light source the more harsh (or hard) it is. The larger it is, the softer the light becomes. One is not better than the other, but they have their places.

There are many ways to alter your little off-camera flash to make it appear larger to your subject, and this is an area I love to play with a bit. Let's talk about that a minute...

Hmmm...inexpensive ways to make your little flash (strobe) appear larger:
  • Bouncing the light off of a nearby wall or ceiling. This can take your little 1" by 2" flash head and turn it into a HUGE light source. (I did just this in my last photograph shown here.)
  • Shoot your strobe thru a piece 8 1/2" x 11" white paper. Want larger? Tape 4 pieces together. 
  • Shoot thru a shower curtain, bed sheet, white trash bag...you name it. You are limited only by your imagination.
Have a little more cash?
  • Get a softbox to hook to the end of your strobe. You will get a very nice look with controlled results. You can buy softboxes in compact 15" x 15" sizes, right on up to 60" x 60" and even larger. They can be a little pricey however.
  • Use umbrellas. These are the best option for the amateur (in my opinion) who wants to spend a few dollars on professional equipment without breaking the bank. You can shoot thru them (best) or bounce light off of them when flipped around. A nice white umbrella can be purchased for about $20 and will do whatever you need it to.
That's a few equipment basics for you. I will touch more on how you can modify your little off-camera flash in later posts that will blow your mind!

Okay, let's move on...


When an object (let's say an apple) is in the presence of a light source (let's say the morning sun shining thru the kitchen window) there are places on the surface that "see" the light, and places that don't. In our example, the front side of the apple (facing the window) receives all the light, head-on. The back side of apple doesn't "see" the sun. This is the shadow side of course. But what about the sides of the apple? Ah, this is what I'm talking about. There is fancy term for this area, but I won't bore you with that. It's basically the area that fades from light to dark. I refer to it as the light-to-shadow-transfer-area. And by looking at this part of the object, you can determine what size the light source is.

Can you look at a photograph and determine the size of the light source used? Sure you can. Look at the first photo of Pinky the top of this post. In this first shot I have the strobe off to camera left 6 feet away, just about at 90 degrees, and placed it a little ways up (maybe 15 deg) so the light is coming down on her. I have done this deliberately so you can see the the "fall-off" area of the light better. [In a "normal" portrait the strobe is placed about at about 45 degrees over and situated up another 45 degrees or so. Define normal...hmmm. Another topic.]

Notice the obvious lit parts of her face. Now look at the shadow area on the left side of her head not being hit by the light at all. Pretty drastic right? You can see defined shadow lines. That's its because this is hard light coming from a small light source. I deliberately did not allow any other light in the picture to come into play here so that you could see what one single (small) light source would do. I like using hard light a lot of the time and in this photograph it highlights my wife's beautiful facial features in a dramatic way. Introducing drama in photography is so fun. It really sets your images apart.

shot at 75mm, ISO 200, 1/250th sec, f/5, strobe facing wall, 1/4 pwr
Now look at the second photo of Pinky. I have totally changed the look and feel of the frame by doing one simple thing. I have taken the very same strobe (an SB-800) and turned it completely around 180 degrees so that it is facing the wall, turning a small light source into a huge light source. Now we have gone from one end of the spectrum to the other and created a very soft light. 

Notice the the left side of her face? Hardly any shadows at all. They're still there, but very subtle. And there is a very broad light-to-shadow-transfer-area between the lit area and the shadow areas. (Take note that the two areas will always be there in some form or fashion.) This is the very definition of soft light in my book.

What I want to emphasize to you is this: To really control your light-to-shadow-transfer-area, it's not about the actual size of the light source in inches (or whatever units of measurement). It's about how close you place that light source to your subject. You can have a huge light source, but if it's placed far away, it will still appear harsh. If light softness is desired (and I define softness as having a broad light-to-shadow-transfer-area), then your light needs to be placed really close up to the subject/object. But...it doesn't have to be close (like in the second photograph of Pinky above) if the light source is so big. It is all relational. If softness is desired and a relatively small light source is used (like shooting thru a piece of copy paper), then yes...you will have to be pretty close to your subject. If your light source is huge (such in my example), you can have it much farther away and still achieve softness.

Pretty neat, right?

I could go on and on...but I will quit for today. Which photograph of Pinky do you like better? (Hint...there's no right answer.)

Thanks for reading!

Brant

Wow, you made it all the way thru my post! I really appreciate you as a reader. Don't forget to register your email for automatic updates up at the top. Please pass this blog post on to your friends using the Tweet, Facebook, and Google+ buttons. That would be awesome.


Friday, March 7, 2014

Snow At Night

I want to pause a bit here and post a couple photos of the snow we just had here in North Carolina a few weeks ago. I will show you how I took them using only the manual controls on my camera as well.

I love the snow, I feel like a kid again when I see it start to fall, don't you? That first couple of hours of a nice little snowstorm makes you feel all warm inside (provided that you are actually inside). Now...I know all the trouble that comes with snow--traffic accidents, power outages, kids are out of school, work is uncertain, etc. But all that stuff aside, for those brief moments in the beginning, I just feel wonderful. Can't describe it. 

Whenever I think of that good feeling, I revert back to one of my favorite childhood movies "A Christmas Story". I think of that part at the end of the movie when Ralphie's mom and dad are sipping on a glass of wine late at night with only the lights of the Christmas tree dimly lighting the room...then it starts to snow outside. It seems to take their breath away. All is right with the world at that moment in time. 

shot at 170mm, ISO 1600, 1/30 sec, f/5.6
Okay, lets get down to some photos here. It was about 7pm at night and it started...

After the first couple of minutes of snow had to grab my camera, of course! Click...first couple of shots--too dark, couldn't see anything but a little glow of the parking lot light. 

Next, I paid a little attention to my settings. I was so quick to get a photo I didn't bother to even look at my ISO, aperture, shutter, and so on. I had my ISO way too low and my shutter way to fast. I had cut out all the light. So, I adjusted the ISO sensitivity all the way up to 1600. Normally I do not like to shoot above 800 because of how "grainy" the picture looks (when you blow it up), but sometimes you don't have a choice if you want to capture the image. I set my aperture almost as wide as I could (f/5.6 at that zoomed-in position) to let in as much light as possible. Then I set my shutter at a 30th of a second. Click...a little better. See above.

But how could I make this image better? I mean, it's OKAY. The snow is highlighted by the  parking lot lamp (which IS neat) and I almost managed to 'stop' the snow with my relatively high shutter speed...but blah, I'm not satisfied. Something's not right.

I wanted a little more dramatic effect. So here's what I did... [And remember what I have said about trial and error in the past? That is the way to get to your final image. Ole T&E is your best friend...and I relied on him that night as well.]


shot at 170mm, ISO 800, 1/3 sec, f/5
First things first...I had an idea of what I wanted this image to look like stuck in my head. Now I just had to make it happen. (Try if you can to start with an idea, then work to achieve it.) 

I wanted a good quality picture, so I set my ISO back to 'my limit' of 800 to see just how good I could do at that level. So that's where I started...if I had to change it back to 1600, no big thing. 

Next, I knew that "stopping the snow" is not what I wanted. I wanted to blur the snow, making each wind-driven snowflake draw out in my photo. So, I knew a slow shutter speed was the key to all this. This would work in my favor, because I was working with extremely low light anyway. So after a few shots--each one coming down on my shutter speed a little more and a little more--a was satisfied with a 3rd of a second. That's about as slow as I can hand-hold my camera without bracing it in some way and still keep everything in focus. After opening up my lens all the way to f/5 to let in just a little more ambient, I was satisfied. The parking lot light is overexposed, but I like it. See above. Now compare the two images...they are like night and day.

Now what do you feel when you look at that last photo? I feel cold! When I look at the snow being driven almost sideways behind the barren branches of that tree, all I want to do is wrap up with the wife and and get a big ole cup of hot chocolate.

I love the snow, especially when I'm all warm inside my home, peering out the window at its beauty.

There is still a little winter left this year, so be ready to grab that camera of yours and have a little fun the next time a few flakes fall.

Thanks for reading!

Brant

Like it here? Resister your email for automatic updates up at the top. Please pass this blog post on to your friends (if you think they would like to read it) using the Tweet, Facebook, and Google+ buttons.