Make sure you sign up on my mailing list (just below on the right) before you leave! Your address is SUPER safe with me.

Monday, July 28, 2014

Embrace The "I Don't Wanna Take Pictures!" Attitude

Summarizing today's post: Dealing with attitude from the kids when taking pictures, patience and photography, capturing the best photographs, balancing indoor lighting with flash.

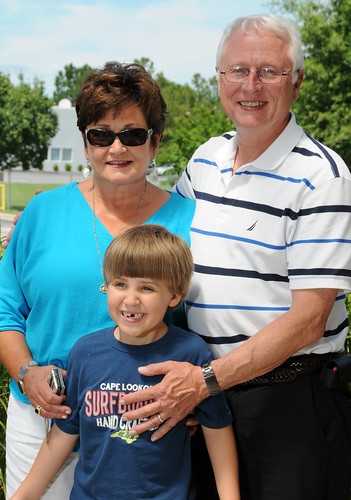
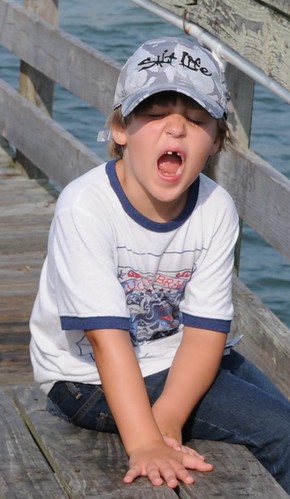
shot at 48mm, ISO 200, f/11, 1/400th of a sec
Let's face it...we all get frustrated when our kids don't want to have their picture taken. You are all set up: camera ready, lighting perfect, little Johnny is all decked out in his finest...and then he won't smile for the camera. As a matter of fact, he won't even LOOK at the you...argh!

It happens to me all the time (if it makes you feel any better). 

Look at Gavin...I can feel my blood pressure start to go up when I remember this day last week. His uncle, his grandaddy, and I took him fishing off of the Nags Head Fishing Pier. I--of course--wanted to take a couple of photographs while out there. So I hauled my camera along with my fishing pole and tackle box. 

"Perfect", I thought. Little Bud was sitting on a bench just gazing out over the water. I called out to him to turn, look at me, and smile while I snapped a photo...and, well, you see what I got.

I swanny, the boy does it to spite his old man. So frustrating to say the least. Oh well. I smile now, but didn't then!

I know this has happened to you as well, in some form or fashion. Lesson learned: patience is a virtue. To be a photographer means to be a master in the art of waiting. Very rarely, do things fall into place right when you want them to. [This is one reason I have started the Camerawith! challenge (see here). You need to be ready all the time for those great shots when they do occur.]

So what did I do when Gavin gave me a smug face? I put my camera away for the time being. I thought to myself..."I'll get him later". I forced myself to have a little patience. There is nothing worse than trying to get some pictures of someone (especially a child) who flat doesn't want their picture taken. It's just no fun for either person.

Ever heard the phase "pick your battles"? Yes, well I came to the conclusion that (for the rest of this day at least) I was not going to ask Gavin to "look at me and smile". I had something else in mind anyway. 

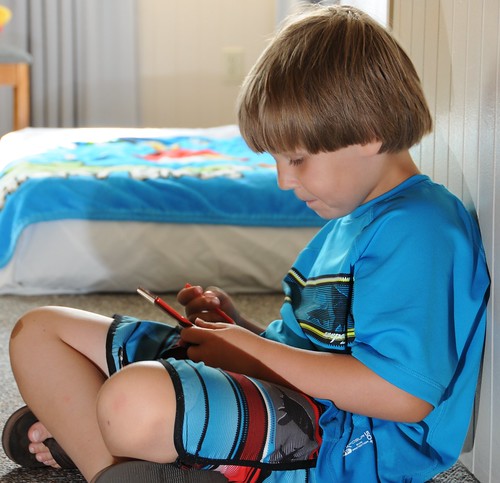
56mm, ISO 200, f/5, 1/15th sec. Strobe camera left at 1/100th pwr
There are times when its best to photograph someone in a natural state vs. trying to get them to pose for you. Later that day Little Bud gave me that opportunity.

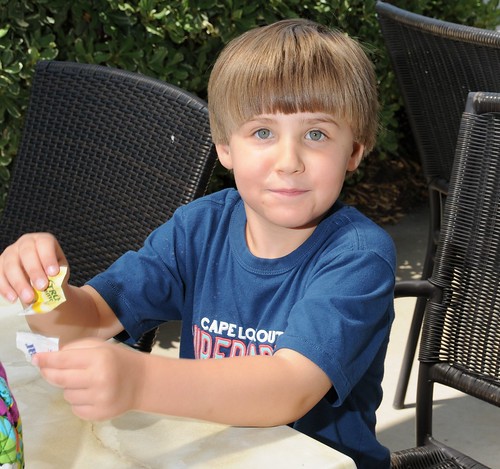
He was quietly sitting in the bedroom playing on his Nintendo DS in his own little world. I decided this was my chance to get in close. He paid me no mind as I sat down just a couple feet from him, which was what I wanted.

The lighting in the room was good, but not good enough. I selected a slow shutter speed to keep all the ambient light at a natural level. Then I added my own light with my off-camera flash (strobe). Set off to the left at floor level and adjusted to 1/100th power (that's not much...only 1% of its capability), this gave me just the right lighting balance. [For more on balancing or leveraging light, see my post "Make Ambient Light Work For You" here.] 

I'd like to mention...there are huge advantages to photographing someone in their natural state. Namely, you can take your time getting all situated and set up, and get your camera settings and lighting just right. You can get a perfect shot without the pressure. You are not stressed, and they are not trying to "hold" a smile.

Click! Pretty nice shot I must admit. I doubt he even remembered it. I smile as I type, because I won the battle :)

Try a little patience next time your young one is giving you a hard time. There is a reason photography and patience start with the same letter, I think they're kin folks. 

Have you found yourself in a similar situation? If so, share. Leave a comment if you have time and give us a laugh.

Thank for reading!

Brant

Like it here? Resister your email for automatic updates up at the top. Please pass this blog post on to your friends (if you think they would like to read it) using the Tweet, Facebook, and Google+ buttons.
 

Friday, July 25, 2014

My Bio, a Throwback in Time (Part 2)

Last time I touched a little on the film cameras that started it all for me (see it here). It was a nice little journey for me as I remembered those "ancient" pieces of beauty.

Today I would like to focus (no pun intended) on the digital cameras that I have had the pleasure to play with over the past 10 years or so. 

Digital cameras have been around for a long time...much longer than you might think. How about 1975? You bet. That's when a very smart man at Eastman Kodak built a prototype of an 8 pound, .01 megapixel camera that recorded images to a cassette tape. Pretty neat.

It took about 10 years for that technology to be put in practical form for you and I to use. Digital cameras started hitting the market for sale to consumers in the late 80s. They were very expensive and not many people had them however. It wasn't til the mid to late 90s that digital cameras started really taking off. Although available in the 90s, I didn't dive into digital until early 2000s.

Most of us have played with a few digital cameras over the years, and here are mine. For the sake of brevity, I am only going to include the 3 cameras I have in my possession currently. This is where I made the transition from film to digital...

50mm, ISO 159, f/3.5, 1/250th, strobe at 1/128th pwr
Don't laugh. This was my first digital camera, bought in 2004. The Aiptek Pocket Cam X. It takes 3.1 megapixel images and has a 1.5 inch display screen on back. It can actually record video as well. For its power source: no rechargeable battery here...it uses 2 AAA alkaline batteries. 

Surprisingly, to this day, it takes pretty clear images as long as there is sufficient lighting (built-in flash is only good at very close range). On the downside, it doesn't have an optical zoom lens (comparable to cell phone cameras).
  
 
50mm, ISO 159, f/3.5, 1/250th, strobe at 1/128th pwr

This is the Panasonic Lumix DMC-FX12. It is a 7.2 megapixel camera with a 3X optical zoom lens (35-105mm). It has all the bells and whistles of a fully automatic pocket camera.

Bought back in 2007, it is still up to par with most point-and-shoot cameras released today in the same price range. It takes great pictures. Its a wonderful little backup camera in case I can't take my DSLR camera with me.

The disadvantage of the Lumix is that you cannot put it into manual mode. 


Shot w/ the Lumix point-and-shoot, strobe added 1/100th pwr
This is the Nikon D300, the semi-professional DSLR camera I shoot with all the time. It is the source of 95% of the photographs you see on this blog.

Purchased in 2008, it has taken thousands of pictures and is still keeping up with me. It is fully manual, yet can be fully automatic if I get lazy. Shooting at 12.1 megapixels and equipped with an APS-C sensor (for more details see here), it is more than enough camera for me. Six years after I purchased it, I am still learning about it.

I have 2 lenses I shoot with. The one shown here is the 50mm fixed (or "prime" lens), and is great for portrait or "macro" shooting (more on that later). The other is an 18-200mm zoom lens, which is great for multipurpose use.

One of the key features of this camera is the Creative Lighting System. It allows me to remotely (and wirelessly) trigger multiple flashes (strobes). This is a magnificent way to let your creativity explode. I could go on, but I will stop at that (for now!). Suffice it to say, I highly recommend this camera system to anyone looking to step into the DSLR arena.

So that's the end of part 2 to my Bio. I have played around just enough with digital photography to make me want to learn more and more about it as I get older.

While I still appreciate film photography (and want to get back "into it" a little more believe it or not), digital is the way of the future. The possibilities to the average Joe--like you and me--are now endless. Just think, 15-20 years ago you had to be a professional photographer with access to a darkroom to really get into this field and enjoy this awesome hobby. We live in a wonderful time.

Thanks for reading!

Brant

Like it here? Resister your email for automatic updates up at the top. Please pass this blog post on to your friends (if you think they would like to read it) using the Tweet, Facebook, and Google+ buttons.

Friday, July 18, 2014

My Bio, a Throwback in Time (Part 1)


Ever since the post "I Am a Photographer" featured back in June (see here), I have been wanting to give a brief little rundown of all the many types of cameras I have used over the years. This will be to make a point for one...and two, I simply want to show you what is 'behind the scenes' of this blog.

Many people think that you have to own the most up-to-date camera equipment on the planet to make beautiful photos. As if to be called a photographer, they first have to spend thousands of dollars. On the contrary, you don't have to have a $5000 Canon DSLR camera with a $900 lens just to dip your toe the photography pool. 

No. All you need to have is the will to walk outside and capture the most beautiful colors known to man on a Fall day...and some sort of camera. That's all you need to start.

Having said that, here are a few of the cameras I have had over my lifetime. As you will see, most are not "all that".

Image not mine, but courtesy of wikipedia.com
The first camera I ever remember playing around with was the Kodak Instamatic, similar to the one pictured here. (I had to be no more than 5 years old.) It was an old camera passed down from my great grandmother. It took an easy-to-load 126 film cartridge. The neatest thing was the "flashcube" (not pictured here). You took a picture, and when you advanced to the next frame, the flashcube would rotate. Four flashes per cube, then you threw it away. How neat! Although wasteful, it was very innovative back in the 60's when they came out. 


Image not mine, but courtesy of wikipedia.com
The next camera that I had was a Kodak disc camera that was passed down to me from my aunt back in the early 1980's when I was 7 or 8 years old. This camera used the old VR format disk film in the flat cartridge. Each held 15 exposures. Not very glamorous but I loved it. It was flat, and I could stick it in my back pocket and carry it anywhere. This was the beginning for me I do believe.


Image not mine, courtesy of flickr.com/photos/mech_for_i/
Skipping ahead a bit to my last film point-and-shoot camera...shown here is the Kodak Advantix T550 camera. It uses the 35mm-like APS film cartridge that pops in from the bottom. I got this one new back in the late 90s and still have it. It takes awesome pictures for a little point-and-shoot, (due to the larger film size that mimicks 35mm) and is completely automatic. It's a nice little backup camera to your backup camera (did you follow that?).


50mm, ISO 100, f/3.5, 1/250th of a sec, strobe 1/128th pwr
This is the Pentax P30. It is a 35mm SLR, fully manual, even down to the focusing. The only thing you can set to automatic is the shutter speed, that's it. It's basic and beautiful. I have two lenses for it along with a flash that can be attached to the hot shoe. I received it as a birthday gift from my parents on my 12th birthday. I've got it still and, in fact, this the actual camera shown here. 

This is the camera that made me realize that I had an interest deep down inside that was a little different than my friends at the time. This was a flame that started to grow into a hobby.

And with that, we'll end part one of my bio. These are the film cameras that started it all for me. Next time I'll touch on some the digital cameras that I have been fortunate enough to call my own.

Here's something I want you to take away from this... You don't have to have all kinds of sophisticated gear to dabble in photography. All you need is some type of camera to START. You can always add gear later.

It's been a nice little journey for me so far...and it all started with a Instamatic camera passed down from my great grandmother. Hope you enjoyed this little throwback in time.

Thanks for reading and happy shooting!

Brant

(Like it here? Resister your email for automatic updates up at the top. Also, pass the blog on to your friends using the Tweet and Facebook buttons.)

Friday, July 11, 2014

Shooting In Morning Sun

Leveraging the sun's light in photography
50mm, ISO 200, f/8, 1/250th, strobe 1/32 pwr

Summarizing today's post: Leveraging the sun's light, early morning outdoor photography, & off-camera lighting.

Let's spend a little more time with the idea of shooting outdoors. When it comes to photography, subtle changes in the time of day and weather conditions means you have to completely adjust how you think. I am constantly thinking--even when I don't have my camera with me--of how I would capture an image if I run across something neat as I go about my day. Thinking...how would I have to light this? Or...Is there enough ambient light? Or...How would I have to adjust the settings on my camera to adapt to this situation. Or...just name it.

So having said that, I wanted to devote one more post to shooting outdoors before moving on (especially since we have darn near 16 hours worth of daylight this time of year). We have touched on shooting in the evening just after sunset (see the post here), and also shooting in full-on sun midday (see here). 

So now what's left? Shooting in the early morning just after sunrise (you could also apply these principles to late day photography just before the sun sets). 

You might think that there's not much difference between shooting at 8am versus 11am, but try it...you'll soon find out.

Now, let me divert for just a minute...

Everyone has their best times of the day when they seem to think or work better. Some folks are morning people, others are night owls. I have known people (when I was in college especially) who can stay up til 3 and 4am consistently because that's when they can get the most done. That's never been me. I have always been a morning person. If I have it my way, I'll get up at 5am everyday because that's when I can think the most clearly and can be the most productive. 

50mm, ISO 200, f/8, 1/250th, strobe 1/32 pwr
Being that I am up every morning before the sun comes up, I can look outside my patio window and see the sun as it moves over the treeline. I decided one morning a couple weeks ago to try and get a few shots of Spooky (yes again...she's aspiring model I do believe) when I saw it was going to be a clear day (no clouds to hinder the sun). What a great opportunity, I thought, to show you guys how to take advantage of this special time of day.


To take advantage of such a wonderful lighting scenario, you have to change your way of thinking as compared to the last post (when taking photos in full-on sun). I can't help to think of the sun as my enemy when it's blaring down at me on a cloudless day...and I am constantly trying to 'tone it down' or control it when forced to take photos under it's bright rays.

But when the sun is low on the horizon--such as in early morning--it's no longer is your "enemy". It actually becomes your ally, your friend. No longer are you trying to shield its blaring rays. On the contrary, you can use them to your advantage. It's another way to leverage light.

So here's an example of how I (as in my last post) leveraged my available light. 

On that morning, when I saw the morning sun just peaking over the treeline, and I saw that Spooky was perched on table outside all nice and pretty...well, I took advantage of the opportunity. [By the way...you have to always be ready when the time comes to get those great shots, they rarely fall in your lap.] 

After adjusting my camera settings to expose for the sunlight, I found my sweet spot at ISO 200, 1/250th of a second, and an aperture of f/8. I wanted to underexpose the frame just a bit before adding my own light...and f/8 was perfect. Then I stuck my strobe on a little lightstand over to the right and set it a 1/4 power. Way too bright. After taking a couple of test shots, I discovered that 1/32 was all I needed. Afterall, the strobe was only about 3 feet from her. 

After I was done playing and setting up, Spooky proceeded to walk all over the patio table and pose like she was on a fashion show catwalk. I kid you not, she was eating it up! Such a great opportunity. The sun turned out to give a nice little highlight--also called a rim light--to her right side (especially shown in the top photograph), while my added light lit up her left side. 

The photos turned out really well, I was quite pleased. I wanted to share...I hope you enjoyed.

If you are a night owl, I have a challenge for you...go to bed early one night so you can hop up early the next morning. Take a short walk around your neighborhood or just sit outside and drink your coffee. Have your camera with you (of course!)...you'll be amazed at the things out there just waiting to be captured.

Thanks for reading!

Brant

Wow, look at you...you made it all the way thru my post! I really appreciate you as a reader. Don't forget to register your email for automatic updates up at the top. Please pass this blog post on to your friends using the Tweet, Facebook, and Google+ buttons. That would be awesome. 


Friday, July 4, 2014

Make The Sun Work For You

44mm, ISO 200, f/11, 1/250th of a sec, full sunlight w/ added strobe

Summarizing today's post: Leveraging the sun in outdoor photography, off-camera lighting, & spending time with family.

Let's talk about leveraging light a little more. I have touched on this previously, now we are going to expand on it a bit.

Everyone is off to the beach this time of the year, vacationing with family or just making a day trip (if you are so blessed to live that close by!). I lived about an hour from the Outer Banks in North Carolina up until I was 19 years old, so I had the privilege of spending many a day on the beaches of Nags Head and Kill Devil Hills. Even though I live much further away now, we still make it a point to go down there once a year around this time. It is a wonderful time together as family. Now...where there's family, there's pictures. That just goes without saying!

So I thought it would be appropriate to talk a little about taking photos in full sunlight. By far--in my opinion--the best outdoor photos will be in the shade, out of the harsh direct sun (see this post for the 'how to' on taking great photos outside while in shaded areas). However, I understand that there's not much shade on the shore at 12 noon...so today I'm going to give you some pointers on how to take some good pictures with the sun right above you.

There is a reason I introduced the idea of using multiple strobes (in my self-portrait, shown here) before talking about taking photos in full sun. The reason is that I want you to think of the sun as just another strobe...albeit a very powerful one! A strobe (flash) and the sun are both light sources. Now, we are going to make the sun work for us, and leverage its light. 

The idea is to balance the sun's light with your other light sources. 

First I am going to show you an example using the equipment I love to use, my Nikon DSLR camera along with one single off-camera strobe. Then I will touch on how you can achieve similar results if you are using a point-and-shoot camera or even a smartphone.

Look at the photograph above...this is a prime example of shooting in direct sunlight. 

We had just finished a nice lunch with the family last weekend to celebrate my wife's birthday (happy birthday my Pinky!) and decided to move outside to take few photos before leaving. I figured what an awesome opportunity to take some professional-looking family photographs. There was a problem tho...no shade nearby. The sun was almost right above us. Yuck. But I made the best of it.

Before everyone had made it outside the restaurant, I had scoped out a nice place on the front patio for us to stand. The patio had (very) transparent fiberglass sheeting covering a small seating area which diffused the sunlight just enough to tone down the direct rays of the sun. I took a couple of test shots for proper exposure. I maxed out my shutter speed to 1/250th of a second (to my camera's sync speed at the time...you can only go just but so high/fast on shutter speed when using flash or weird things will happen). Then I had to close down my aperture to f/11. ISO set to 200. 

Now I was able to control the bright sun without washing out my frame. Now comes the addition of my strobe. Why even add flash you might say? Because without it, our faces would have had very dark shadows on them, due to the harsh sunlight. So to balance this contrast, I had to add some of my own light. And after shooting (and deleting) several frames, I found the sweet spot of setting my strobe to 1/2 power. That's a lot of power from a strobe that's only 6-7 feet from your subject, but that's what you have to do to compete with full-on sun.

Now how was this photo taken being I was in the picture? Funny you should ask. My mom took it! She gets tired of me taking the pictures all the time, so she asked me what to do with my big ole bulky camera, then I jumped in so I could get a photo with the birthday girl. My 6 year old son held the strobe over to Mom's left side and aimed it right at us while she snapped away. Not bad, huh? They did great :)

Here are some more shots I took after I wrestled my camera away from Mom.

Here's one of Pinky with my parents:

shot at 44mm, ISO 200, f/11, 1/250th of a sec, full sunlight, strobe added at camera left at 1/2 power

One with Gavin jumping into the picture (he just has to be in the middle of everything!):
Full-on sunlight, with added strobe
And lastly, one of Little Bud himself just messing around:
Another illustration where I am mixing full sunlight with artificial light
We had such a good time that day, as you can probably tell by looking at the photographs. Precious memories. I am so glad I remembered to take my camera--happiness extended as a result.

Now I did promise to show you how to achieve similar results as these with a point-and-shoot camera or smartphone. So here it is...you have two choices. The first option, you can cheat and turn on your on-camera flash (manually). This will at least put a little highlight on your subject's face to reduce contrast caused by the sun. Take a shot a see if the flash is too much. If so, try this...hold a very thin white napkin about an inch away from your flash. This will soften the light. Adjust as necessary. You may have to move closer to the person you are shooting.

The second option is a little more creative. If you have a friend with you (who you are not taking a photo of at the time), put them to work. Let's say you are at the beach this weekend and you want to take a picture of little Johnny building a sandcastle. The sun is overhead and to his right. Have your friend kneel down on his left side and hold a opened-up white towel (by the corners so it will hang straight down) just outside of the camera's view. Turn off your camera's flash and shoot away! The sun's light will reflect off the towel and the shadows on Johnny's face will be softened. Try it, you'll be surprised of the photographer in you.

Good stuff, go have fun.

Thanks for reading!

Brant

Wow, look at you...you made it all the way thru my post! I really appreciate you as a reader. Don't forget to register your email for automatic updates up at the top. Please pass this blog post on to your friends using the Tweet, Facebook, and Google+ buttons. That would be awesome.


Friday, June 27, 2014

Camerawith!

170mm, ISO 200, f/5.6, 1/25th of sec, ambient light only

I'm starting a challenge here, and it's called Camerawith! 

At its very core, it means to always have your camera nearby, whenever possible. In other words, carry your camera with you! What good is it if you leave it at home? You can have a $5,000 Nikon camera, and if you don't have it when an awesome picture is just waiting to be captured, what good is it? I'd rather have a $200 camera in my pocket in that case.

Everyone has a cell phone with a camera nowadays. Granted, there are some out there that are better than others...but for the most part, the quality of the pictures they produce cannot compare with those of a basic point and shoot camera with a zoom lens. So when I say, 'Take Your Camera With You', you can't cheat and say..."well, I've got my phone!". Save your smartphone for the selfies (click here if don't know what a selfie is) and birthday party snapshots. 

I use my smartphone camera all the time for snapshots, and it's great for just that...snapshots. It's wonderfully quick for taking a quick shot of our little boy, my wife, or one of the pussy cats and then posting it on Twitter or Facebook. I mean, it couldn't be easier right?

But Camerawith! is referring to something deeper. Everyone has an artistic side of themselves, and for you and I (I say you because you are reading a blog about photography) our outlet/release for our artistic ability is thru taking photographs. Photography is an art at its very core, and this challenge is designed to get you open your eyes and see the world around you. Then, when you happen across something outside of the ordinary, spend that extra few minutes to get out your camera and capture that moment. 

And this part is KEY...when you have your camera with you, you will begin to look for and seek out things you can capture that on an ordinary day you would walk right past. It's like when you got a Nerf gun as kid, what do you do?? You look for things to shoot at. Same thing. Simply by taking your camera with you, your eyes will open up. How neat.

Do you know what this challenge will do for you if you take it on? It will make you a happier person. It will UP your level of satisfaction...that feel-good-but-don't-know-why feeling. With all the craziness in the world and negative things in this life that tries to consume every bit of your time, we all need a little intentional positive reinforcement. Essentially, all I'm encouraging you to do is "stop and smell the roses"...but instead of smell them, photograph them. If you will take just 5 minutes out of your day (that's less than half of one percent by the way) and photograph something that stands out to you, it will force your level of contentment to rise...I promise you. Your life-appreciation will begin to increase. 

So, which is the best camera to 'take with you'? That's easy. The one you will use! If you are not comfortable with a DSLR (the type of camera with interchangeable lenses), the next best thing is a point-and-shoot camera that you can put in manual mode (click here for my post on shooting in manual mode...It'll open the door to a whole new world). But seriously...the best camera is the one you will actually use. (I will touch on a few examples of some of the more inexpensive cameras I recommend in a later post if you are interested.)

Note the little squirrel up top. He is just helping himself to some bird seed, shamelessly. It tears my father up when he looks outside and finds the squirrels stealing the birds' food that he takes time to put out every day. It makes me laugh to look at this photograph. It brings me to a happy place in my mind and makes me focus on my parent's home more than the actual squirrel. If I had of forgotten my camera that day when we went to go see them, I wouldn't have captured this image and this brief little nugget of happiness would have escaped. 

Camerawith! ...Take Your Camera With You. Accept the challenge and go out and shoot something meaningful to you today.

Thanks for reading!

Brant
 

Friday, June 20, 2014

Make Ambient Light Work For You

cat, pet
50mm, ISO 400, f/2.8, 1/60th sec, ambient & artificial lighting
Summarizing today's post: Off-camera lighting, balancing ambient (available) light with flash, & pet photography.

Now that I've touched a bit on what it is I am doing here -- my purpose so-to-speak -- let's get back to lighting.

Using two off-camera strobes is my personal lighting of choice, as in my self-portrait (shown here). One to camera left, the other to camera right. The key light is the muscle -- illuminating the scene with the majority of the usable light -- and the fill light is there softening the shadows cast by my key light.

I've tried in the past to give a little encouragement to those who do not have but one off-camera flash at this point in their collection. Gear is expensive (I realize) and I want you to learn everything you can about one piece of equipment before you go spend more on something else. As I have said before...I could keep myself busy for a long, long time with just a single strobe.

Now, as promised, I will demonstrate how you can make that one little strobe go further. It's all about using what is already there...good quality ambient light. And striking a balance. It's all about balancing light...or leveraging light. (We'll talk a bit more on leveraging light next time.)

What you have seen me do the most in past posts -- when it comes to adding my own light with strobes -- is to "cut out" or "turn off" all ambient light before doing anything else. I do this by working indoors and setting my camera to a fast shutter speed (most often to 1/250th of a second). 

Why do this? Two reasons. To make a point with the lighting set up I am demonstrating at the time (the main reason), and two, most indoor lighting stinks when it comes to using it in your photograph. The light is either too yellow (projected by incandescent lamps) or too green (thrown off my fluorescent lights). So off with you! (I think its so neat that you can "turn off" the light you don't need without going over to the light switch...but that's just me.)

Now we are going to switch gears and move outdoors. True, you can take some good shots indoors using only one strobe, but in my opinion you get the best results by mixing controlled artificial light with available light. And the best available (ambient) light is found outside...in the shade. 

So let's go, grab your camera and your one strobe and find yourself a nice shady spot outside. The best time of day to shoot in our case is going to be right after sunset, but as long as you can find an abundance of shade (say under the covering of some thick trees) you can do this even during the middle of the day. We are looking for that pure "white light" to use as our ambient, natural light.

I am using Spooky as my subject today. Such a sweet pussy cat...she's all into what ever I am doing outside at the time. You saw the finished product up above, but let's see where I started first.


shot at 50mm, ISO 400, f/2.8, 1/80th of a sec, natural outdoor lighting just after sunset
After adjusting my camera settings for the correct exposure using only ambient light (which always takes a few practice shots before I even focus on the subject) I was ready to go. Spooky was actually ready before I was, she had plopped down in a perfect pose. This first shot of her stretched out on the table was using only natural available light. OKAY, but her face is underexposed...a little too dark. 

Let's bring out my little SB-800 strobe and lighten her a little.

shot at 50mm, ISO 400, f/2.8, 1/60th of a sec, strobe to camera left added, set at 1/128th power
Now, she is really getting into it! Flipped all upside down posing like a pro. My goodness. I set up my strobe to camera left and powered it down to the lowest possible setting, 1/128th. It doesn't take much to throw a little highlight onto her in this relatively low light condition (and with the strobe set up only 4 feet away). I increased the background (ambient light) just a tad by setting my shutter speed slightly slower in this photo.

Now I'm satisfied. All the colors of her coat are shining bright. Beautiful.

This is balancing light. This is how to make ambient/natural light work for you. Go try it for yourself and have some fun.

Thanks for reading!

Brant


Wow, look at you...you made it all the way thru my post! I really appreciate you as a reader. Don't forget to register your email for automatic updates up at the top. Please pass this blog post on to your friends using the Tweet, Facebook, and Google+ buttons. That would be awesome.